HOW TO GROW DAHLIAS
DAHLIA HOME PAGE
DUTCH
DAHLIAS
DAHLIAS FROM UK
DAHLIAS FROM HOLLAND
WEB SITES
DAHLIA LIST
DAHLIAS FROM NEW ZEALAND
DAHLIAS FROM USA
HOW TO TAKE CUTTINGS
DAHLIAS FROM AUSTRALIA
DAHLIAS FROM BELGIUM
DAHLIAS FROM RUSSIA
DAHLIAS FROM
CZECH REPUBLIC
*************************************************************************************************
How To Grow Dahlias
With A Brief Introduction
To Their
Origin
Dahlias have an interesting history.
The first tubers arrived in Europe at the end of the 18th century,
sent over to Madrid by the Spanish settlers in Mexico.
Andreas Dahl (after whom the plant is named) regarded it as a vegetable rather
than a garden flower, but interest switched from the edible tubers to the
blooms when the first varieties with large, double flowers were bred in Belgium
in 1815.
Within a few years nearly every colour we now admire had been introduced and
Victorian
catalogues listed hundreds of varieties.
The favourites in those days were the Ball and Small Decorative Dahlias.
Today it is the Large Decorative and Cactus varieties which capture the public
fancy. Fashions change but the popularity of this late summer flower continues
to increase.
The reasons for this devotion to the Dahlia are fairly obvious. First of all the
skill of the breeders in England, Holland, Germany, Australia and America has
produced a range of sizes and colours unmatched in the world of garden flowers.
Plants ranging from dwarf bedders (twelve inches high) to giants taller than a
man. Flowers range in size from an inch to the largest dinner plate.
Equally important is the time of flowering.
From the end of July to the first frosts, Dahlias provide large orbs of colour
when so many flowers are past their best.
Above all the Dahlia is an accommodating plant.
It likes a good loam, but will grow almost anywhere. It relishes sunshine, but
can still do well in partial shade.
A bed just for Dahlias is really the ideal way of growing them, but they are
quite at home in the herbaceous border or even the rockery for dwarf bedding
varieties.
How
to Grow and Disbudding
WHERE TO PLANT DAHLIA TUBERS
Dahlias will grow in almost any location and
in almost any soil.
However, to have outstanding plants and flowers, you must be selective of the
planting placement.
Dahlia roots need a sunny location in order to thrive. They should receive at
least a half-day of sun and even more is preferable.
Select a site for your dahlia garden that is away from trees, sunny, and yet
sheltered from direct wind.
Dahlia tubers are surface feeders.
Since they don’t send down a tap root or long feeder roots the plants will
easily be blown over by the wind.
Staking the plants is essential and will be covered later with planting
instructions.
A further important consideration is the condition of the soil.
In most cases, a good everyday garden soil is adequate.
But good soil drainage is vital for dahlia plants.
If the soil holds surface water for more than several hours after a rain, the
likelihood is that it should be augmented with organic matter.
Humus, peat moss, sand, or well-rotted manure will work well. A mixture of equal
parts of all of the above makes an excellent addition to heavy soil.
HOW TO PREPARE THE DAHLIA GARDEN
SOIL
If at all possible, choose the planting site
in the fall.
Dig or till your plot and start working in compost, peat moss, sand, and rotted
manure. Keep the site as weed free as possible during the winter months.
This will make your spring work and planting much easier.
Then as spring comes, the area will need a further digging, or tilling to a
depth of at least six inches but eight to ten inches is better.
If you choose to use a commercial fertilizer,
be sure to keep the nitrogen (the first of the three content numbers) to a low
number.
For example, a 5-20-20 would be adequate.
This of course should be well worked into the area in a ratio of 3 to 5 pounds
per 100 square feet.
Further fertilization should not be needed although some people apply a second
mid-season application of the above formula to their dahlias or use a similar
ratio in a liquid form.
HOW TO STORE DAHLIA TUBERS
The storage of dahlia tubers prior to planting
is critical. Tubers must not be allowed to freeze or to be placed in a room that
is heated above 50 degrees F. A temperature of around 40 degrees F is preferred.
The tubers must be stored in a dark location, high in humidity. A root cellar or
basement with a dirt floor makes an excellent storage area.
Continue to check your dahlia roots (tubers) weekly for rot or mould. As you
handle the dahlia tubers be careful not to damage the growing point known as an
‘eye’. Remember, that is your future plant.
WHEN TO PLANT DAHLIA TUBERS
The dahlia tuber is unlike many other bulbs in
that it wants to be planted in warm soil compared to say, tulips.
A rule of thumb for planting time is: plant dahlias when you would plant other
root type vegetables such as carrots.
In other words, spring should be well on its way with the longer and warmer
days.
PLANNING A DAHLIA GARDEN
Now that the area for planting your dahlia
tubers is well prepared and your stock of tubers is in hand, it is time to
prepare a garden layout plan.
Because certain varieties grow considerably taller than others, you should plot
where you want tall plants and where the shorter than average should go.
Also, if colour mass is important, then get these details laid out before you
actually begin to plant.
Many commercial dahlia suppliers indicate the approximate height of the plants
in their catalogues.
Using this information can be a help in formulating your layout plans.
The layout plan will also need to take into
account the number of varieties that you plan to plant.
The average planting space between plants is 18 to 24 inches, especially for the
large flowering varieties.
The shorter varieties can be planted closer together, but remember, when you dig
those clumps in the autumn, you definitely don’t want them intertwined with
their neighbour.
Plan for the rows to be three to five feet apart, depending on the size of the
plant.
When the rows are two to three feet apart, the plants will generally grow taller
as they ‘reach’ for light and your access up and down the rows becomes more
difficult.
Close planting also shuts down air circulation to the lower leaves, encouraging
powdery mildew.
If you plan to use a hand tiller between the rows, then plan your rows according
to its width and be sure to leave extra width so as not to till too close to the
plants and damage those new tubers.
TIPS FOR PLANTING THE DAHLIA
TUBERS
Prepared holes for planting should be 5 to 6
inches deep.
If you plan to stake the plants, NOW is the time to do this and not later when
you may damage the tuber by running a stake through it.
Pound a sturdy stake, 4 – 5 feet tall into the ground beside the tuber hole.
Some have found tomato cages to be satisfactory in supporting the plants, but
these too have wire spears and so they should be put in place when you can see
exactly where the tuber is to be located. Tomato cages are generally only
satisfactory for the smaller plants. With the stake or tomato cage in place and
a planting hole on one
or both sides of the stake, place the tuber in the hole laying longwise on its
side, with the sprout or eye facing up. If the tuber has a sprout an inch long
or more, care should be given not to damage the fragile shoot.
However, if this does happen, and it is very easily done, then don’t despair,
there are auxiliary eyes at the base of the broken shoot and they will grow, but
you will have lost some advanced growth in your future plant.
Do not add fertilizer to the hole as this may damage the new tender root
system.
Cover the tuber with 4-5 inches of dirt. Some gardeners have found it helpful to
hill the plants as they grow to provide support to the stems, but often this is
not adequate in wind prone areas.
Tie a name-tag on your stake so you will know later which plant is growing
there.
HOW TO WATER DAHLIAS
Unless it is a very dry spring, it should not
be necessary to water at the time of planting. The tubers will begin growing
with the warmth and moisture in the soil.
It is vital that they form a root system early in their planted life to assure a
strong and healthy plant.
Watering at the time of planting may encourage rot causing you to wonder why
that prized variety is not growing.
When you carefully investigate the problem, you may not even be able to find the
tuber or you will find a lump of rotten muck.
Not a pretty sight!
Once the plant begins to grow you can begin to water every few days.
Watering will be necessary in most areas throughout the summer months.
Water dahlias at the root level using a drip system.
Deep watering or in other words, a good soaking is better than passing a spray
on the plants for a short period.
In fact, it is much preferred in order to prevent disease on the foliage and to
conserve water.
Many growers find the soaker hose in its various forms to be the best and then
the water goes in the soil where the plant needs it.
HOW TO FIGHT DAHLIA PESTS
Once the shoot is above the soil surface, the
first slug within a city block will ‘smell’ it. Be prepared!! Get out that slug
bait and spread it liberally everywhere, or the slimy pests will devour every
tender morsel for lunch! You may have other methods of taking care of these
hungry critters, but I have found the slug pellets to be my favourite as I can
broadcast them over an area very quickly and in most cases with good results.
MORE DAHLIA GROWING AND PLANTING
HELP
Now that you have gone to all that work, you
will want to care for your plants and see them produce beautiful prize-winning
blooms.
Keep the area weed free, or at least as much as your back will tolerate.
Also remove any broken or damaged foliage.
Good air circulation, especially near the ground is needed by the plants to
prevent powdery mildew.
Once the plants are several feet high the lower leaves can be removed to
increase air circulation.
TYING DAHLIA PLANTS TO THE STAKES
When the plants get to be a foot tall, be sure
to begin tying them to the stakes.
A wind will lay your plants flat from here on and may even break the stalk from
the tuber. (Then you will be sad!) You will need to continue to tie them to the
stake every 18 to 24 inches.
If you grow 4 or more plants of one variety, you may find it easy to run garden
twine the full length of the row.
This can easily be done down each side of the plants using the existing name
stakes.
The twine should be spaced every 8 – 10 “up the stake and can be secured on the
stakes just with a single wrap around each stake as you go down each side of the
row.
This fast method works well until your housemate snips the string while cutting
a bouquet of flowers.
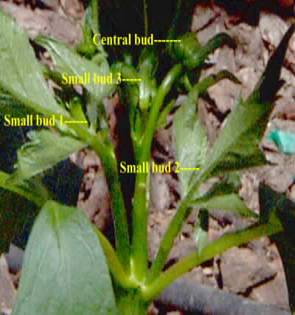
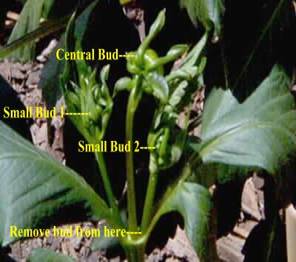
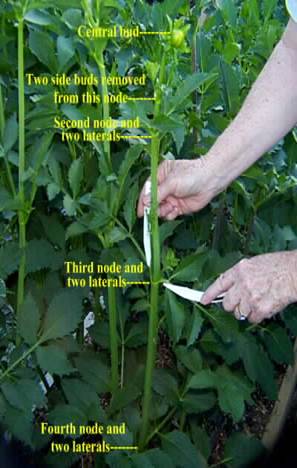
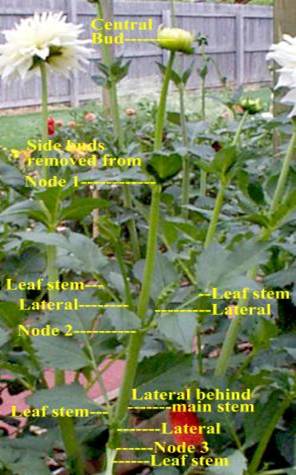
Disbudding Dahlias